To Temple College Class  logo R. Craig Collins > Intro to Computer Graphics > Lab 6

Lab 6 © R. Craig Collins, 2007    

General Lab Directions
Note: There is not enough time in lecture to cover all the material; go over the reading material BEFORE you begin the lab
Note: Typically labs will require you to invest some time in the lab, outside of class lecture hours

•Note: Please read the related overview material before continuing
Check with your Instructor for due date, typically Friday, 11:59PM (see due dates)

 •NOTE:
    •View a video similar to Lab 6.

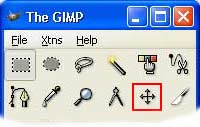
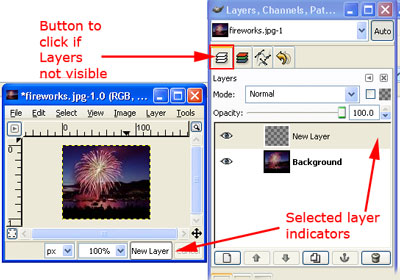
   •Begin creating and testing the Lab (link to graphic construction requirements)
   •No QUIZ for lab 6. Check this location in the next lab to answer questions concerning topics covered in the Lab
     (You will later transfer this information into a D2L quiz)
You may download an acrobat or word processing document to help you with this.   

At the end of this process,
1) you will submit the web page files by zipping them, and placing them in the Desire2Learn dropbox area. Instructions on zipping are below.

     • Optional: Open/save an Acrobat pdf document to print with directions
       (get Adobe Acrobat Reader free, here)
     • Optional: Right click/save a Word docdocument to print with directions
     • Optional: Right click/save a Rich Text rtf document to print with directions

Part 1, Activity (100%):
You may download an acrobat or word processing document to help you with this.

 • Create a lab6 folder
 • Copy dam02a.png and dam02b.png into the lab6 folder.

dam02a.png
dam02a.png
   dam02b.png

   dam02b.png

 • Rotate dam02a.png 2° clockwise. Save as lab6.png
   • Increase the canvas size to about 5 inches wide, with the new space to the right

We could open an image, expand the canvas size, then copy and Paste the other two graphics into the image.
In the GIMP, on occasion, when resizing the canvas, you must choose Layer\Layer to Image Size in order to use the entire Canvas.

When pasting, you may wish to anchor a floating layer into the existing layer, using Layer\Anchor Layer.

Or you could use Paste Into to drop the copied item directly into the existing layer.

Starting now, you'll see that the images should each be on separate layers, allowing us to move them around until everything lined up... so instead of anchoring the layer, you could use Edit/Paste As and choose New Layer... then we can move the items on different layers independently. You just need to make sure you have selected the proper layer in the Layers, Paths, and History dock, which normally opens on the right of the desktop.

   • Paste dam02b.png into your new lab6.png
     Note: in the GIMP, on occasion, when pasting, you must go to the Layer tab of Layers, Colors and paths,
     right clidk the pasted layer, choose New Layer... before you can actually use the layer; or use Layer\Anchor Layer.

     Use the Move tool tool (red outline, below, to drag the dam02b.png image until it lines up with dam02a.png
     Move tool location
     You may cut away parts of each file if it helps.
          Just make sure the correct layer is selected,
          choose the rectangular selection tool (gray outline above)
          select the area you no longer wish to include,
          then choose Edit/Delete
     (Remember, you may be working on two separate layers, select the correct layer first
       the GIMP layers control

   • Move dam02b until it lines up, making a new panorama image
   • Adjust the brightness and contrast as needed (may need to select the correct layer to adjust)
   • Crop as needed to get just the new, combined image.
   • Save as lab6b.png
   • Final step, create an optimized jpeg file: Save as lab6.jpg, and optimize.

Final product should look similar to image below
(obviously without the Sample text running across it. I didn't want you to just 'borrow this one :)
Dam Sample

 • Zip the lab6 folder, rename it to yourname-lab6.zip and submit in the D2L Lab 6 dropbox
   View a video similar to Lab 6
   Video, including Optimization


No quiz this week

Problems? Zip the entire folder and attach to an email:
       •Send the mail to your instructor, cc yourself
       •The subject line should include your name, your class, your section, and what you are submitting
       •Make sure you attach the zipped file

SUBMITTING THE LAB

In Windows, zip the entire lab6 directory, and rename to yourname-lab6.zip.
       •Example: yourname-lab6 or yourname-lab6.zip (if your extensions are visible)
Log into Desire2Learn, choose this class, choose Dropbox, and select Lab 6.
Browse to yourname-lab6.zip and upload it. (Scroll down to see detailed instructions)

Choose the Quizzes menu, and locate Lab 3: animation.
      • Using D2L dropbox       • Using D2L Quizzes      • Logon to D2L
To submit by Temple College Desire2Learn:
       •Log into D2L, scroll to the bottom, and choose the correct course
       •When the Course Home Page appears, click on the Dropbox link.
              •You may click on Discussions, Dropbox, or Quizzes below, for more info

       D2L navigation D2L Dropbox notes D2L Quizzes Notes D2L Discussion Notes
Dropbox directions