![]() R. Craig Collins >
Common> Training Home Page> How To: Update TConnect Instructor Info
R. Craig Collins >
Common> Training Home Page> How To: Update TConnect Instructor Info
How to Update TConnect Instructor Info
Note: providing Syllabus and Vitae information is not a Temple College campus rule, this is State law (HB 2504: Public Access to Course Information);
the reason is so potential students can find syllabus and vitae information for every class that every Texas College or University offers.
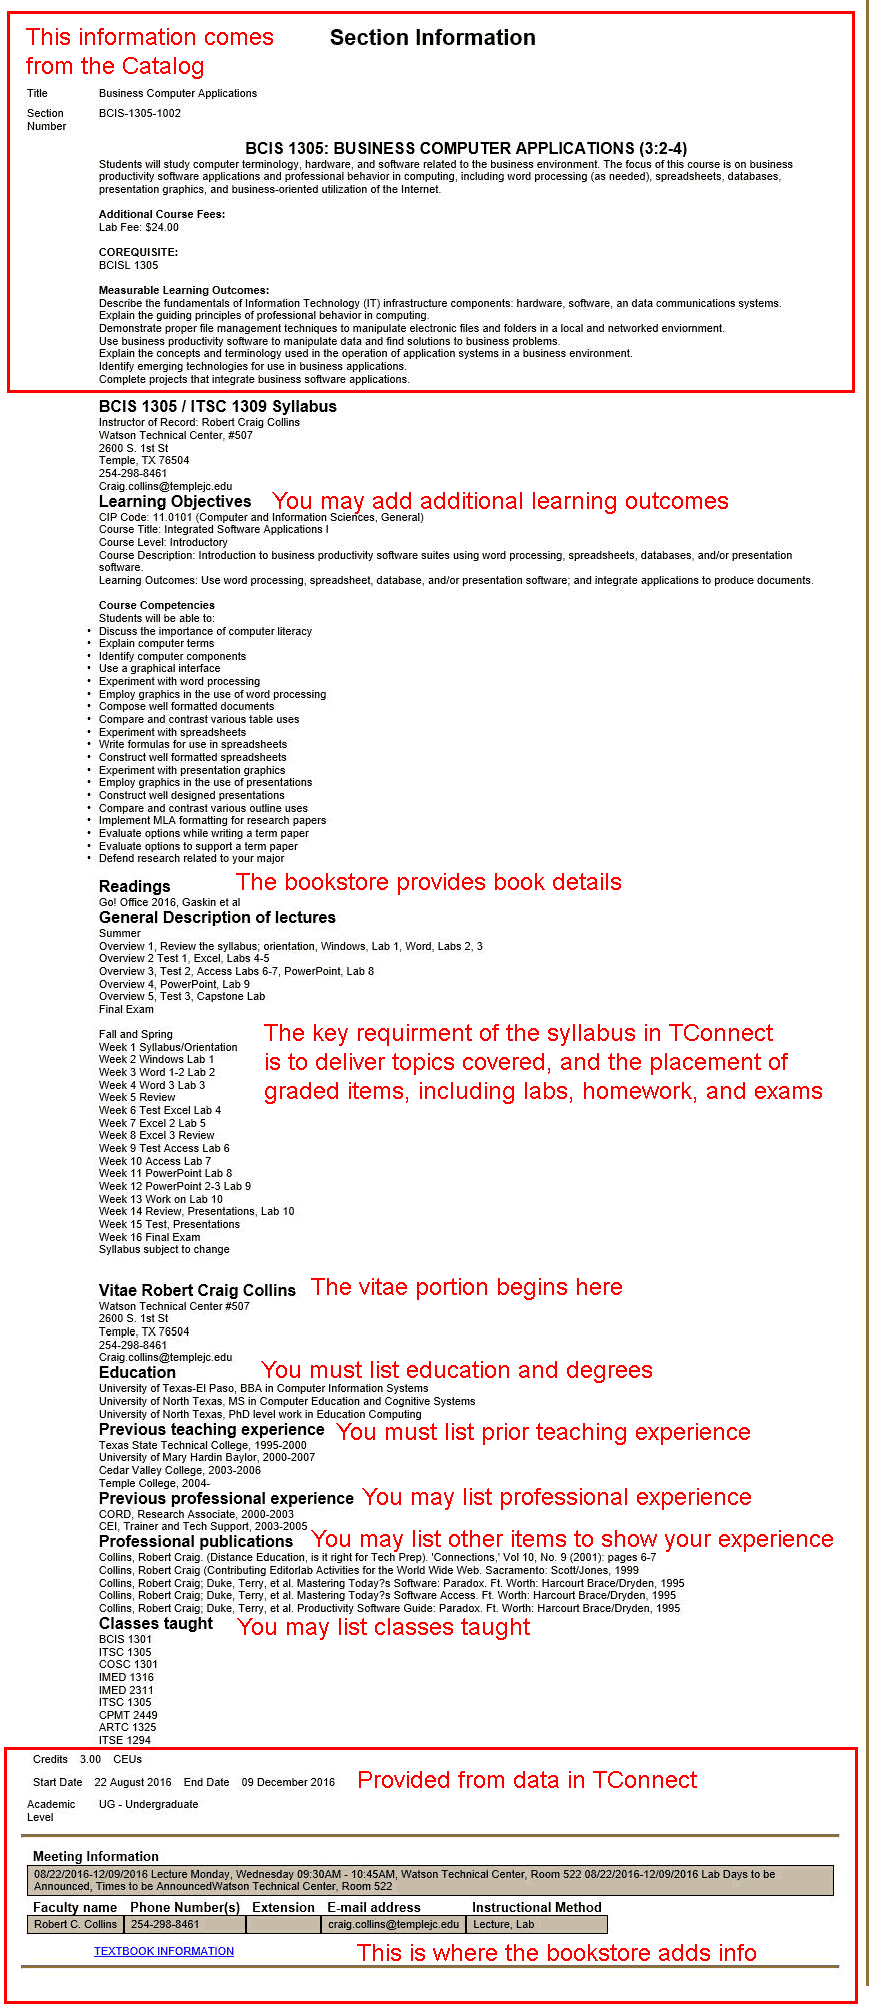
| A completed TConnect page that includes the required information is here (pdf), or see a large image below. |
This information does not have to be the same detailed syllabus your give out in class, but state law requires at least certain information be made available.
This document is just a starting point that includes the State required elements. You may put more information, in different sequences, etc.
You can update the document every semester if you like, but the STATE requires you to list your credentials to teach in a Vitae section, and your lecture topics and events like labs and tests in a Syllabus section. The syllabi do not have to be by week, one option is to list by topic.
However, you cannot simply upload your Word or Acrobat documents…as this information must be displayed on a web page (in our case, a web page delivered via TConnect).
This means you must type (or copy/paste) plain text/HTML formatted text into TConnect.
Download and fill out the information required for the vitae and syllabus sections; save as a plain text file (txt) to avoid format issues
syllabus.txt
vitae.txt
Optional, Additional HTML formatting that works in TConnect
Below are the OLD documents that demonstrate the end result, use with caution as format issues may arise
syllabus.doc
vitae.doc
(These are starter documents; your department may require more information, or you may wish to add additional information.
There may be optional information (as indicated by <!-- comment--> notes) that can be deleted.
Delete the entire line of any item not used.
Again, ALL LINES MUST END WITH <br>
You will now log into TConnect and Copy/Paste your completed syllabus and vitae documents into a small TConnect editor window, steps listed below
Go to www.templejc.edu and choose TConnect

Login to your account


Choose Faculty

Choose: Faculty Section Information Maintenance
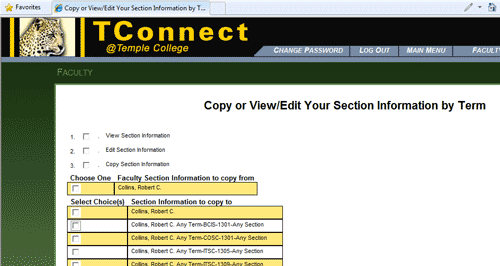
You will be presented with the following screen:
 |
The first time you perform this action, you have nothing to copy, so |
| set the Copy From Term* to be the same as the | |
| Copy To/Edit Term* | |
Enter or update the TC Campus Extension and Then press [SUBMIT] |
|
| The first time you perform this action, you will get the following screen | |
 |
Choose to Edit Section Information, and choose the item that simply contains your name. This is where you will enter your vitae information. |
If possible (before you are ready to enter the information), generate a basic vitae.
It is best to download and edit vitae.doc, then copy paste. Vitae.doc is just a starter document; you or your department may wish to include other information.
Some items in the vitae.doc are optional... marked by parenthetical notes. Delete the optional items you and your program don't need.
(How to Copy/Paste
After editing your word document, choose Edit/Select All, or Ctrl+A to select all,
then choose Edit/Copy, the Copy icon in Word, or Ctrl+C to copy the material,
switch to the TConnect window and click IN the Information box, and
then choose Edit/Paste, the Past icon in Word, or Ctrl+V to paste the information in. )
Note: you may save your material as a web page to enable more elaborate formatting, then copy paste the web page.

When finished editing or pasting, choose [SUBMIT]
You will now see that your information has been rearranged; items at the top are complete.
You you can now move on to adding the syllabus information for your courses.
If possible (before you are ready to enter the information), generate a basic syllabus.
It is best to download and edit syllabus.doc, then copy paste. Syllabus.doc is just a starter document; you or your department may wish to include other information.
Some items in the syllabus.doc are optional... marked by parenthetical notes. Delete the optional items you and your program don't need.
Choose to edit one of the courses.
You will need to select the Edit Section Information box, as well as the class of interest.

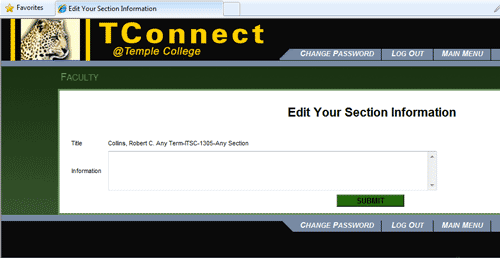
Simply copy paste your syllabus information, then choose [SUBMIT]
Note: If you have submitted your text book requests, text book information should be automatically pulled from the book store web site.
You will not need to edit your vitae information unless you wish to add items in the future.
If you have chosen to use the Any Term, Any Section option, ALL future classes are NOW READY to go... you will only need to come back to edit a class if you change your syllabus.
A future document will address changing existing syllabus or vitae information.
Note: you cannot copy a course into a course that already has the syllabus content... you have to delete the old content, then you can copy the new content.
Advanced usage (skip down to see What the students will see)IF you have an occasion where ONE section needs to be changed, you can copy the 'master' section info to the single instance, then edit the single instance.
|
In TConnect, select the Search for Credit Classes link to you will see the following screen.
Enter the Term*, and your last name in the Instructor's Last Name box... choose [SUBMIT].
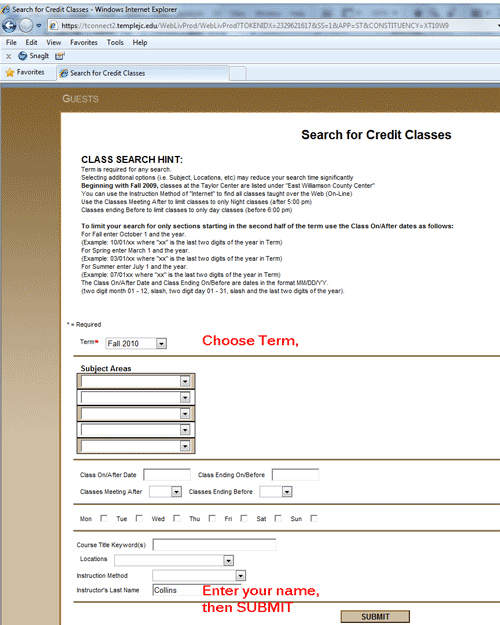
Locate the appropriate class, in my case, I found ITSC 1305. Click on the INFO link.

The view: Currently the Datatel course title information displays at the top, the syllabus displays just below that, the vitae displays just below that, and the Datatel class information is at the bottom. The last item is a link labeled TEXTBOOK INFORMATION which connects to the Bookstore database, and the associated book info for your class... larger view of a completed TConnect page with the Syllabus and Vitae is below.

Check back for a link to updating existing syllabus and vitae information.
More info from Alan Lytle; workshop to be developed soon:
If you have the syllabus under “Any Term BCIS 1111 Any Section” and then
Either copy and modify it or copy/paste a new one to “FA2012 BCIS 1111 Any Section” then
That version will be used for all the FA2012 sections, but if you don’t copy it forward to
SP2013 then the “Any Term BCIS 1111 Any Section” will be used for SP2013.
Works on a “hierarchy” and quits as soon as it finds information in one of the following:
So once you make a “Specific Term, Course, Any section” if you want that to be your new “default” you have to copy it over to the
next term(s) until you change it again. So yes we would have the historical content and the new content for the new term, but
it would not “carry” forward unless you copy it forward.
We should instruct the faculty to set up the “default” under the “Any Term, Course, Any Section” simply as a template,
but then always copy it forward to the “specific terms, any section”. That way you can even make minor adjustments to the “Any Term, Any section” and not effect previous terms. Then if the “Any Term, Course, Any Section” is current that will display until they can get it copied it to the new term yet.
Example:
Setup the “Any Term, Course, Any Section”
When complete copy to SU2010 and FA2010
When SP2011 comes copy “Any Term, Course, Any Section” to SP2011
When SU2011 comes copy “Any Term, Course, Any Section” to SU2011
If changes needed for FA2011 wait until have copied to SU2011, make the changes (highlight/delete in tconnect then copy/paste new doc)
in the “Any Term, Course, Any Section”
For FA2011 copy “Any Term, Course, Any Section”.
So always copy the “Any Term, Course, Any Section”
Larger view of completed TConnect page with the syllabus and vitae information.