![]() R. Craig Collins >Common
> How To: Word
R. Craig Collins >Common
> How To: Word
How To: Word © R. Craig Collins, 2005, 8
See my Word Crash Course for more up to date information
Info on creating a résumé (use of templates) here.
Research papers/Advanced features, or for capstone projects (double space, set margins, headers, footnotes, etc.) click here.
Info on working with Word Documents here
Info on editing Word documents here
Starting Office Applications, Options, and Help
If you are not familiar with how to start Microsoft Word, read this section
carefully, and then just use the method (Start Button, Menu, or shortcut)
that you prefer. There are often hundreds of ways to do things in Windows;
none are wrong, so just use the one that makes since to you.
Office 2007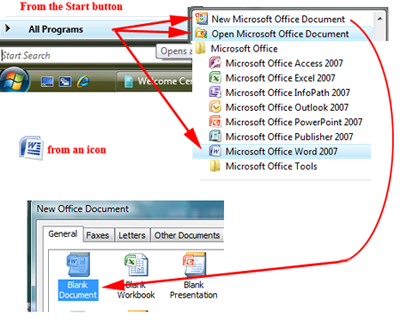 |
Office 98/XP/2003 |
Working with Toolbars ot Tabs
Office 2007
Larger versions of the Ribbon are below. You may also right click a blank spot next to the tabs, and choose Customize Quick Access Toolbar The Word Office Button options |
Office 97/XP/2003 In Word, you will primarily use the Standard and Formatting tool bars. These can be configured to squeeze into one row by hiding some tools, or fitting on separate rows. If you cant find a tool, click the >> buttons that are available to see the hidden features.  Choose View\Toolbars for more options... point to each icon to see a help bubble naming the tool |
Understanding Dialog boxes.
Many of the tools require additional information when clicked
this is handled
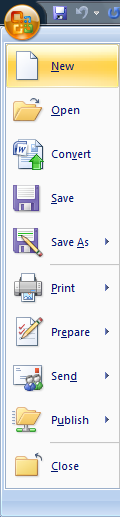
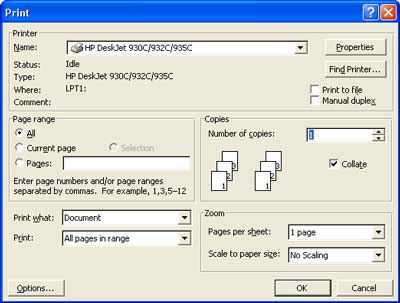
with a dialog box that will open. If you click ![]() and choose Print (or [Alt] + [File\print], a dialog box
will ask which printer to use, which pages to print, and how many copies,
etc. Make any changes you like, then click [Ok].
and choose Print (or [Alt] + [File\print], a dialog box
will ask which printer to use, which pages to print, and how many copies,
etc. Make any changes you like, then click [Ok].
Understanding the Helper Windows/Task Pane
| Office 2007 When you choose |
Office 98/XP/2003 |
Setting Application Options
| Office 2007 Since we are all individuals, we all will want to interact with the program in a different way. This can be done with 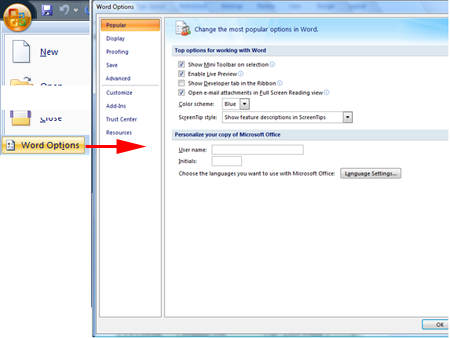 |
Office 97/XP/2003 Since we are all individuals, we all will want to interact with the program in a different way. This can be done with the Options dialog box. In Word, this is done by selecting Tools\Options. See below for a sample dialog box. I would avoid making too many changes for the time being.  |
Help: Whats Available
Rather than call your instructor, many times Word can answer your question
for you. In 2007, choose the (?) above the ribbon.
![]()
In Earlier versions, choose the Help menu item.
A similar book chapter is available online here.
Now that you are a little more familiar with the product, now you can actually
start using Word.
Working with Word Documents
Starting a new document.
When you choose to start a new document in Word, you can take several routes. You can:
| Office 2007Office 97/XP/2003 To open a new document, follow these steps:
 Saving a document. Once a computer is turned off, anything not copied to the hard drive just disappears… to save your résumé, you will need to save it to your hard drive, or a floppy disk. An unsaved file requires a location to save in, and a name for the document. This is done with  Once a file is saved once, changes to the document are done with the You may now close your document, and reopen it later if you wish to add to it, print it, etc. |
Office 97/XP/2003 To open a new document, follow these steps:
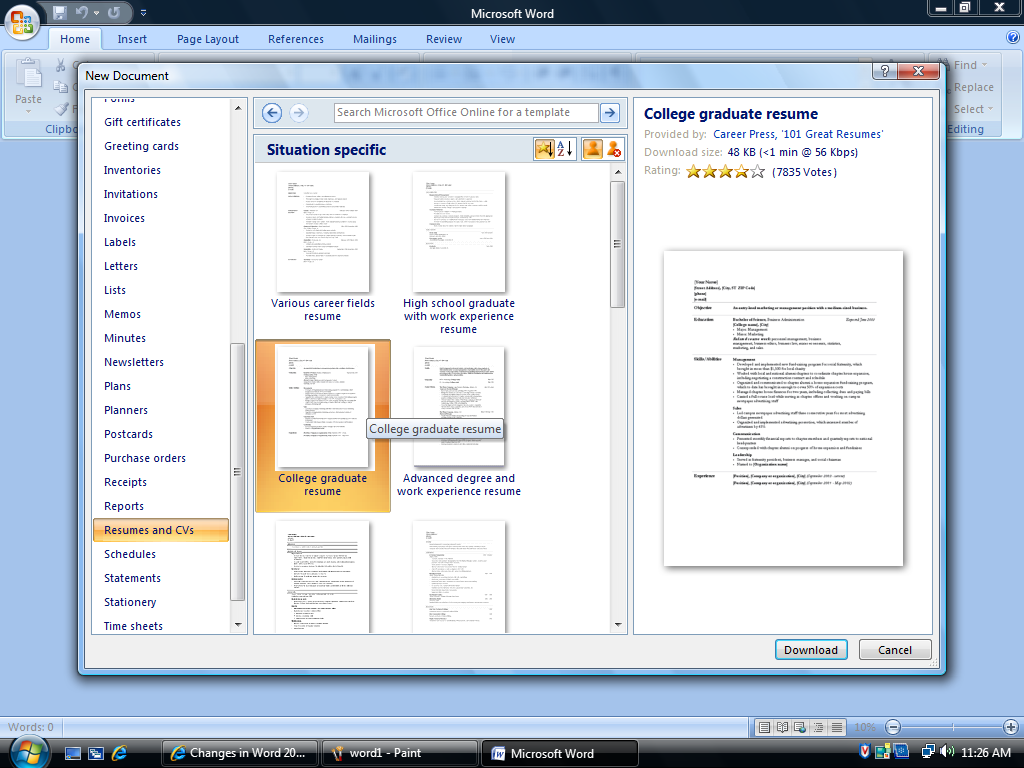
Your lab assignments includes a résumé, and a discussion on Wizards is a great way to start. (The lab information below includes step by step use of the Résumé Wizard, or watch a video on using the résumé wizard.)
Saving a document. Once a computer is turned off, anything not copied to the hard drive just disappears… to save your résumé, you will need to save it to your hard drive, or a floppy disk. An unsaved file requires a location to save in, and a name for the document. This is done with the Save As dialog box.  Once a file is saved once, changes to the document are done with the Save command. You may now close your document, and reopen it later if you wish to add to it, print it, etc. |
Editing Documents
Adding or replacing text and moving in the document.
The real advantage of word processors over typewriters is that you can change
a document, even after it is saved. Ideally, you type in your ideas quickly, to
keep your train of thought, then you come back and clean them up a bit. In word
processors, you can change words, move words, copy words, what ever.
Click here for a list of ALL Word
keyboard shortcuts.
If your hand is on the keyboard, it is faster to use the keyboard instead of reaching
for the mouse, especially for tasks that you find your self doing all the time.
In order to move a word or line, you have to be able to select it. Aside from
adding words, you will eventually want to delete or remove words
Copying , cutting, and pasting text.
I can not stress enough the need to practice this section, and memorize the following
shortcuts
[Ctl] [X] to cut
[Ctl] [C] to copy
[Ctl] [V] to paste
You can also have multiple documents open, and move words and sentences from one
document to another.
Formatting, or Changing how text looks
Understanding fonts
Once you have your words making since, then and only then do you make them look
pretty. You never paint a house while your are adding walls, and the same is true
with word processing
you can spend all of your time formatting text, instead
of entering text, if you jump the gun. Youll spend 10 minutes making a sentence
look just right, then later wind up deleting the sentence
so just remember, create,
edit, THEN format!
Fonts basically defines how
the words look, the shape, the size, the color, and so on. The most common formatting
is
[Ctl] [B] to bold
[Ctl] [I] to italicize
[Ctl] [U] to underline
Try using Office 2007 Home tab for the Font group, or earlier versions use the Edit/Font menu to get to the font dialog box; both give you one stop access to all
aspects of a font. You can also experiment with aligning text from the Menu bar!
This web page continues below...
Tips and tricks to completing a Résumé, or other documents created from a template or wizard.
NOTE: In order to correctly name files for ALL labs, your computer MUST be displaying file extensions. See FAQ for details.
Of course, you could always craft a document by hand, using tables, such as below
| Experience | Job 1 Job 2 |
| Education | School 1 School 2 |
| Reference | Person 1 Person 2 |
If using Word 2007, you can
For those using Word 2007, you may watch a video on |
If using Word 2003, you may use the Résumé Wizard.
For those using Word 97/XP/2003, using the Wizard can help you build a résumé. For more details, watch a video on using the résumé wizard, |
More advance features.
See also Capstone Project Overview
Many research papers expect you to be able to:
Optional, video on Outlines
double space your document,
set margins
use headers/footers
create automatic footnotes, or
count the words in your document.
• Word 2007 Outlines, video
• Word 2007 Bibliography, video
Each of these topics is covered briefly below. Refer to the Word Help tool, or a reference book if you need more details or options.
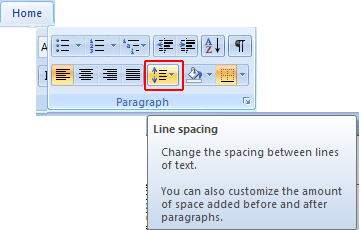
Double Space
2007
To double space your document, choose Home tab/Paragraph group, then
in the Line Spacing button (![]() ),
),
or select ![]()
then
change the
Line Spacing Options choice to Double...

97/XP/2003
To double space your document, choose Format/Paragraph, then
in the Spacing area, change the line spacing Drop
Down Menu choice from Single to Double...
Set Margins
2007
To set your margins, choose the Page Layout tab, then in the Margins
area,
(![]() )
)
choose a predefined set of margins, or choose Custom margins to change the Top, Bottom, Left and Right Drop Down Menu choices to the desired
value, such as 1"

97/XP/2003
To set your margins, choose File/Page Set Up, then in the Margins area, change the Top, Bottom, Left and Right Drop Down Menu choices to the desired
value, such as 1"
Use Headers and Footers
2007
To use headers and footers,
choose the Insert tab, then Heads and Footers.

Choose Header, and Blank. Type your text, then click the Page Number button. Typically, you don't want headers or footers
on a cover sheet, so you might look under the Page Layout tab and choose ![]() ,
,
or select the Design tab that is available when editing Headers and Footers, and choose different first page. Once you click Ok, you'll be back to viewing
the current page... if you are on the first page, move over to the next page,
by clicking the Next Section button.

You might type your name, press the [Tab] key to get to the center of the document, and type
your document name, then press [Tab] again, to get to the right side. Click the Page Number # button
to insert the current page number. Choose Current Location.
(This automatically changes, if you add more
pages.) Choose Close, when you are finished.
97/XP/2003
Headers and Footers are already in your document. To use headers and footers,
choose View/Header and Footer. Typically, you don't want headers or footers
on a cover sheet, so you might want to first click the icon that looks like
an opening book, the Page Set Up area. Under Layout,
choose different first page. Once you click Ok, you'll be back to viewing
the current page... if you are on the first page, move over to the next page,
by clicking the last button, the Show Next button.
You might press the [Tab] key to get to the center of the document, and type your name, then press [Tab] again, to get to the right side. Click the # button to insert the current page number. (This automatically changes, if you add more pages.) Choose Close, when you are finished.
Using automatic footnotes
2007
To use footnotes,
choose the References tab, then Insert Footnote. For more help, choose ![]() .
.


97/XP/2007
To use automatic footnotes, place your cursor at the end of your quote. Choose
Insert/Reference>Footnote. I like the basic settings, so
just click Insert. An automatically sequenced number will be
added at the end of the quote, and you will be dropped down to the bottom of
the page the quote appears on, so you may add your quoted sources info. When
finished, just click your cursor back in the document area, to continue typing
or editing.
Technically, MLA format uses end notes, rather that footnotes, but for my class I use footnotes due to the instructive nature of seeing the footnote stay on the page of the quoted item.
Word Count
2007 Method 1
Look at word count in the lower left hand corner of the Window
![]()
2007 Method 2


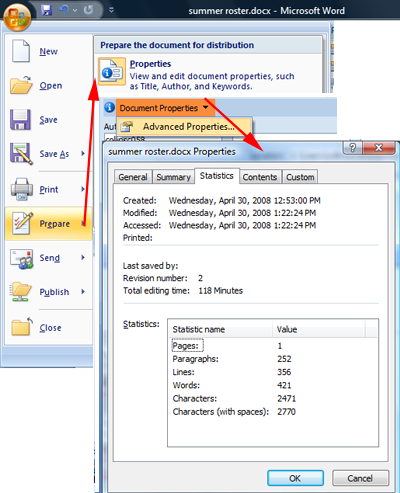
2007, Method 3... Properties and Word Count
![]() Prepare, then choose Properties. On the bar that opens, click the Document Properties and choose Advanced Properties
Prepare, then choose Properties. On the bar that opens, click the Document Properties and choose Advanced Properties
97/XP/2007
There are several ways to count the words in your document, but File/Properties and choosing Statistics is an easy one to remember.
Word 2007 Outlines, video
See also How to Write a Term Paper
See also MLA Citation format
Word 2007 Bibliography, video
Basic Dictation Input Commands
Say To New line Starts text on the next line. New paragraph Starts a new paragraph. Microphone Turns the microphone off. Tab Press the TAB key once. Enter Press the ENTER key once. Spelling mode Spell out the next word. Pause after spelling out the word to return to normal dictation. Forcenum Enter a number or symbol instead of spelling it out. Delete Deletes the selected word. Space Inserts a space. Backspace Deletes the character to the left of the insertion point. Next cell Moves the insertion point one cell to the right. Spell it or Spell that Spell the next wordSelection Commands
Say To Select word or Select phrase Select the word or phrase given. Select word Select the last recognized word. Unselect that Unselect the currently selected text.Correction Commands
Say To Correct word or Correct phrase Delete the word or phrase given. Correction Delete the selected text or the last recognized phrase. Correct that Delete the last recognized word or phrase. Insert after word or Insert after phrase Move the insertion point to the right of the word or phrase given. Insert before word or Insert before phrase Move the insertion point to the left of the word or phrase given. Scratch that Delete the last recognized phrase. Delete that Delete the last recognized phrase.Capitalization Commands
Say To Capitalize or Cap that Capitalize the first letter of every word in the last phrase or the selected text. Uncapitalize or No caps that Make all letters lowercase in the last recognized phrase or the selected text. All caps that Capitalize all letters in the last phrase recognized or the selected phrase. Cap it phrase Capitalize the first letter of the first word in the phrase. All caps phrase Capitalize all the letters of the first word in the phrase. No caps phrase Make all letters in the first word of the phrase lowercase. Caps on Turn on CAPS LOCK.Punctuation Commands
To insert a: Say . Period or dot , Comma : Colon ; Semi-colon ? Question mark ! Exclamation point & Ampersand * Asterisk \ Backslash / Slash - Dash = Equals @ At sign + Plus sign # Pound sign % Percent sign $ Dollar sign ( Paren ) Close paren " Quote ' Single quote