![]()
![]() R. Craig Collins >
Web Page Design >
Folders and Paths
R. Craig Collins >
Web Page Design >
Folders and Paths
Folders and Paths © R. Craig Collins, 2005/6
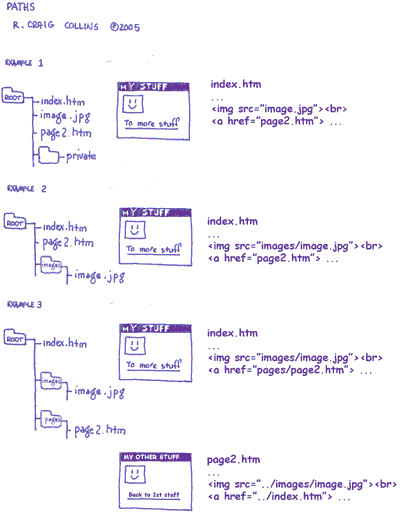
In order to better organize your files, say web pages in one place, and images in another, the easiest thing to do is to create folders. However, this will change how you reference web pages for links, and images to display. Instead of simply listing the file name, you will direct the browser to locate the appropriate folder, then select the file. This is called the path.
Navigating paths
If files are in the same folder, simply name the files
="filename.htm"
if files are in a folder below, name the folder and then name the file
="folder/filename.htm"
if files are above, get out of the current folder with ../ , then name the file or folder, and then name the file
="../foldername/filename.htm"
or
="../filename.htm "
Lab 3 example
Lab 4 example
Example A (the old fashioned way, as in lab 2):
Web page saved in Lab3
image1.gif saved in Lab3
![]() \
\
![]() lab2
lab2
|- page1.htm
|- page2.htm
|-
pink_fabric.gif
|-
yellow_fabric.gif
|- bike.gif
<img src="bike.gif"> or add height, width, and alternative
text information
<img height="150" width="150" src="bike.gif"
alt="This is a a picture of a bike">
Example B:
Web page saved in LabZ
bike.gif saved in a folder inside of Lab3 called images, Windows path: Lab3\images
![]() \
\
![]() labZ
labZ
|- page1.htm
|- page2.htm
|
|
|-![]() images
images
|- pink_fabric.gif
|- yellow_fabric.gif
|- bike.gif
<img src="images/bike.gif"> or add height, width, and
alternative text information
<img height="150" width="150" src="images/bike.gif"
alt="This is a a picture of a bike">
The '/' character directs the browser to first find the folder named 'images',
then look inside for the file named 'bike.gif'
Example C: (as in Lab 3)
Web page saved in a folder inside of Lab3 called pages, Windows path:Lab3\pages
bike.gif saved in a folder inside of Lab3 called images, Windows path: Lab3\images
![]() \
\
![]() lab3
lab3
|
|---- ![]() pages
pages
|
|- page1.htm
|
|- page2.htm
|
|
|---- ![]() images
images
|- pink_fabric.gif
|- yellow_fabric.gif
|- bike.gif
This requires the browser to go UP from the pages folder, then down the path
toward bike.gif
<img src="../images/bike.gif"> or add height, width,
and alternative text information
<img height="150" width="150" src="../images/bike.gif"
alt="This is a a picture of a bike">
The '../' characters direct the browser to go
UP one level, then drop back down into the folder images, and find the file
named 'bike.gif'
Note: the links from web page to web page remain <a
href="filename.htm">click here</a>, since they are in the
same folder
Example D:
Web page saved in a folder inside of LabA called pages, Windows path:Lab3\pages
bike.gif saved in Lab3
![]() \
\
![]() labA
labA
|- pink_fabric.gif
|- yellow_fabric.gif
|- bike.gif
|
|---- ![]() pages
pages
|- page1.htm
|- page2.htm
<img src="../bike.gif"> or add height, width,
and alternative text information
<img height="150" width="150" src="../bike.gif"
alt="This is a a picture of a bike">
The '../' characters direct the browser to go
up one level, then look inside that folder for the file named 'bike.gif'
Example E: (as in Lab 4)
Web page saved in a folder inside of Lab4 called pages, Windows path:Lab4\pages
bike.gif saved in a folder inside of Lab4 called images, Windows path: Lab4\images
![]() \
\
![]() lab4
lab4
|
|- index.html
|
|---- ![]() pages
pages
|
|- page1.htm
|
|- page2.htm
|
|
|---- ![]() images
images
|- pink_fabric.gif
|- yellow_fabric.gif
|- bike.gif
For index.html to display an image requires the browser to open the images folder,
then open bike.gif
<img src="images/bike.gif"> or add height, width, and
alternative text information
<img height="150" width="150" src="images/bike.gif"
alt="This is a a picture of a bike">
For index.html, to link to a a web page, such as page1.htm, you apply the same
logic: open the pages folder, then choose page1.htm
<a href="pages/page1.htm">Click here</a>
(For page1.htm to link to index.html, use <a href="../index.html">Click
here</a>)
