![]()
![]() R. Craig Collins >
Web Page Design >
Frames
R. Craig Collins >
Web Page Design >
Frames
Frames ©
R. Craig Collins, 2005/13
To review complex frame concepts, click here.
To code a complex frame, click here.
Note: NVu/Kompozer doesn't do frames
Dreamweaver, after CS 5, can open them, but can't create them.
Earlier Dreamweaver that could create frames often messes up and uses absolute addresses instead of relative addresses, and creates pages to put in the frame rather than letting you choose an existing page.
For that reason I offer frame templates to help you with your labs.
• A frameset carves a browser window in to spaces, either columns or rows
• A frameset can contain a frame, which holds a web page
or
• another frameset
Framesets and Frames are a way of opening multiple web pages in the same browser window,
such as in two rows,
| Page1 |
Page2 |
This "Step By Step" consists of two parts.
In the first part we explain how
to create a "simple 2 row frame" frameset page, one that
is divided up into JUST rows or JUST columns, but not both. A good example of
this would be a home page that has a "toolbar" that takes you to different portions
of a Web site.
The second part of this page explains how to create a complex frameset page.
Once you've learned how to create simple frameset pages, it's actually quite
straightforward to create a "complex " frameset page;
one that can have both columns and rows. The code for the complex frame is below.
To jump to complex frame concepts, click here.
To jump to code for a complex frame, click here.
Remember, framesets and frames are a way of dividing the browser's screen into different independent portions. In the "simple" case, you will be dividing the screen into only columns or rows. For this example, we'll create a page with two rows.
| Row 1 (20%) |
Row 2 (80%) |
The next step is to create the frameset page that describes how the page
is laid out. Here's the HTML for our frameset page:
<HTML>
<!--Note: no body tag is required... the web pages that are opened within the frame provide that info-->
<!--Note: later you we'll add back the head tag to pass a title, etc.-->
<FRAMESET ROWS="20%, *">
<FRAME SRC="row1.htm">
<FRAME SRC="row2.htm">
</FRAMESET>
</HTML>
Framesets divide the web pages into placeholders.
Frames fill the placeholders with a web page.
The number of values that follow the ROWS= or the COLS= determine how many rows or columns will be created.
The values assigned determine how big the row or column is... either in pixels or as a percentage of the screen.
The * used above means "what ever is left over."
Thus row one will be 20% of the available screen, and row two will be what ever is left, in this case 80%.
When viewed, this page will be divided
into two rows, showing the two files that you created: row1.htm and row2.htm.
| To create a page with two columns
instead of two rows, simply use COLS instead of ROWS in the FRAMESET tag: <FRAMESET COLS="20%, *"> |
Because each frame is a separate browser, clicking a link in one of the frames
will go to a new page in that
frame. In some cases that may not be what you want.
It's possible to create a link that, when clicked, makes a new page show up in
another frame. To do this, you need to name the frames, just as you named your anchors to make bookmarks.:
<HTML>
<FRAMESET ROWS="20%, *">
<FRAME SRC="row1.htm" name="firstrow">
<FRAME SRC="row2.htm" name="secondrow">
</FRAMESET>
</HTML>
Let's say you want to be able to click a link in the top frame
and have a new page come up in the bottom frame.
To do this, place the following
in row1.htm:
<A
HREF="newpage.htm" TARGET="secondrow">Click here to see "newpage.htm"
in the bottom frame</A>
The TARGET attribute causes the link to be opened in the bottom frame.
| If you want to be able to click
a link and have a new page fill the window (replacing the frameset), use
TARGET="_top" as follows: <A HREF="newpage.htm" TARGET="_top">Click here to see "newpage.htm" take up the whole window</A> And if you want the page to come up in an entirely new Internet Explorer window, use TARGET="_BLANK" as follows: <A HREF="newpage.htm" TARGET="_BLANK">Click here to see "newpage.htm" come up in a new window</A> Note: This works even on pages that do not have frames. To avoid cluttering the user's desktop with windows, this feature should be used sparingly. |
If you do not want users to be able to resize a frame, add a NORESIZE attribute to the FRAME tag:
<HTML>
<FRAMESET ROWS="20%, *">
<FRAME SRC="row1.htm" NORESIZE>
<FRAME SRC="row2.htm">
</FRAMESET>
</HTML>
If you do not want a frame to have scrollbars, add a SCROLLING
attribute to the FRAME tag and set it to "NO" to disable the scrollbar:
<HTML>
<FRAMESET ROWS="20%, *">
<FRAME SRC="row1.htm" NORESIZE>
<FRAME SRC="row2.htm" SCROLLING="NO">
</FRAMESET>
</HTML>
Both of these settings are useful when creating toolbars.
To skip to complex frame concepts, click here.
To skip to the code for a complex frame, click here.
| When using borderless frames,
it's often helpful to be able to position a frame's contents directly at
the top left corner of the frame, instead of a few pixels down and to the
right, as is the default. To do this, change the individual frame page (in this case, row1.htm or row2.htm) so its BODY tag includes the following: <BODY TOPMARGIN="0" LEFTMARGIN="0"> |
Now that you know how to create simple frameset layouts, it's very straightforward to make complex ones. A complex frameset is just a simple frameset, but some of the carved spaces are filled with framesets, instead of frames.
IMPORTANT CONCEPT: A FRAMESET carves space that can be filled with a frame, or another FRAMESET..
Let's say we want to create a page that has an index on the left and three frames
of content on the right:
To do this, we create a frameset with two columns. The first column will contain
frame 1, and the second will contain another frameset that holds frames 2 through 4. Here's the HTML:
<HTML>
<FRAMESET COLS="20%, *">
The first column is just a single frame:
![]() FRAME SRC="frame1.htm"
FRAME SRC="frame1.htm"![]()
But for the second column, instead of using another FRAME tag, we insert a FRAMESET tag with three
rows.
<FRAMESET ROWS="20%, *, 20%">
![]() FRAME SRC="frame2.htm" name="topframe"
FRAME SRC="frame2.htm" name="topframe"![]()
![]() FRAME SRC="frame3.htm" name="middleframe"
FRAME SRC="frame3.htm" name="middleframe"![]()
![]() FRAME SRC="frame4.htm" name="bottomframe"
FRAME SRC="frame4.htm" name="bottomframe"![]()
</FRAMESET>
Then we close the FRAMESET and HTML tags, and we're done.
</FRAMESET>
</HTML>
Thus, by "nesting" one frameset inside another, complex frame layouts
can easily be built from simple ones.
| We could have created the same
layout by using two FRAME tags and pointing the second FRAME tag to a separate
file that was itself a frameset. The above syntax, in which we can insert
a FRAMESET block instead of a FRAME tag, is actually a shorthand that reduces
the number of files needed by one. There's one case in which you don't want to use the shorthand: when you want to click a link in frame 1 and have a page come up that replaces frames 2, 3, and 4. In that case, you would do it the longer way, giving the second frame a name and using |
Making Frameset Pages Visible in Browsers that Don't Support FramesSince frameset pages usually contain no content, just a set of FRAMESET and FRAME tags, they tend to not show up at all in browsers that don't support frames. Fortunately, the frames standard provides an easy way to provide content for non-frame browsers. Before the ending </HTML> , insert <NOFRAMES> |
Placing a Colored or Textured Border Between FramesWith many HTML 4 compliant browsers, you can not only turn off the 3-D, you can also specify that the borderless frames should be a particular distance apart. Because this allows the background of the frameset page to show through, if your frameset page has a background color or image the effect is that of a colored or textured border between the frames.<HTML> <BODY BACKGROUND="woodgrain.gif"> <FRAMESET ROWS="20%, *" FRAMEBORDER="0" FRAMESPACING="20"> <FRAME SRC="row1.htm"> <FRAME SRC="row2.htm"> </FRAMESET> </BODY> </HTML> The code above places a 20-pixel border between the two rows of the frameset. Because the author has specified a background graphic (woodgrain.gif), there will now appear to be a 20-pixel-wide textured border between the frames. (To use a background color instead of a background image, use BODY BGCOLOR=color name or value.) |
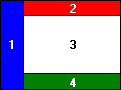
Coding my sample:
It is always a good idea to draw out your design
| Table of Contents Book the First: Recalled to Life Chap 1 Chap 2 Chap 3 Chap 4 Chap 5 Chap 6 |
A Tale of Two Cities |
| IT WAS the best of times, it was the worst of times, it was the age of
wisdom, it was the age of foolishness, it was the epoch of belief, it was
the epoch of incredulity, it was the season of Light, it was the season
of Darkness, it was the spring of hope, it was the winter of despair, we
had everything before us, we had nothing before us, we were all going direct
to Heaven, we were all going direct the other way- in short, the period
was so far like the present period, that some of its noisiest authorities
insisted on its being received, for good or for evil, in the superlative
degree of comparison only. There were a king with a large jaw and a queen with a plain face, on the throne of England; there were a king with a large jaw and a queen with a fair face, on the throne of France. In both countries it was clearer than crystal to the lords of the State preserves of loaves and fishes, that things in general were settled for ever. ... |
|
| This page brought to you buy your local Realtor© |
Modern
HTML standards include a DOCTYPE to tell the browser to expect the frames...
I have included one below .
(NOTE, the code for the left web pages that open in the frame is under the frame code, below.)
| Click here to actually see this frame implemented Code for frame |
<!DOCTYPE html PUBLIC "-//W3C//DTD XHTML 1.0  Frameset//EN" "http://www.w3.org/TR/xhtml1/DTD/xhtml1-frameset.dtd">

<HTML>
<FRAMESET cols="200, *">
 <FRAME name="side" SRC="side.htm">
 <FRAMESET ROWS="20%, 70%,*">
  <FRAME name="top" SRC="top.htm">
  <FRAME name="middle" SRC="middle.htm">
  <FRAME name="bottom" SRC="bottom.htm">
 </FRAMESET>
</FRAMESET>
    <!-- optional noframes tags could go here-->
</HTML>
<!DOCTYPE HTML PUBLIC "-//W3C//DTD HTML 4.01 Transitional//EN"> <html> <head> <title>Side of Frame</title> <meta http-equiv="Content-Type" content="text/html; charset=iso-8859-1"> </head> <body bgcolor="#0000FF" text="#FFFFFF" link="#FFFFFF"> Table of Contents <p>Book the First: Recalled to Life</p> <p>middle.htm" target="middle">
Chap 1</a><br>
</p> </body> </html>