![]()
![]() R. Craig Collins >
Web Page Design >
Forms
R. Craig Collins >
Web Page Design >
Forms
Forms © R. Craig Collins, 2005/13
To form code examples
To a form template
to NVu forms quick start
to Dreamweaver forms quick start
Up until now, all activity on a web site was the web site delivering information to users; there was no interactivity, no way for the user to communicate back to the holders of a web site. This shortcoming can be addressed in many ways, but one of the easiest is a form.
A form is an area of a web page that allows:
(from text book session 1) text information to be entered, or
(from text book session 2) preset options to be selected and then
(from text book session 3) the user can Submit.
Once the information is entered,
the form includes a mechanism to collect and submit the information.
(While often submitted information is meant to be processed, such as a shopping
cart attached to a database, we will limit the actual implementation of forms
in this arena to basic delivery (using email or a server that will acknowledge the submission but do nothing with it)
Of the two types of form collection areas mentioned above, there are several options.
Text information can be a smaller text fields, or a larger textarea field,
and
presets include radio buttons (single selection, this or that), checkboxes (multiple
selections) or selections from a list.
A form is defined with the <form></form>
tagset.
We will add two attributes to this tag at the end of the process.
You place all of your form controls between
these two tags, and you only have ONE set of form tags.
The examples below show individual forms; a real form would have all the pieces between the two, and only two, tags...<form ...></form>
<form ...> </form> |
We will have to add an action and a method to the form
tag in order for it to work, that is covered below.
As with lists, tables, and frames, simply creating the form is not enough,
we need helper tags:
input
or
textarea
or
select
<form ...> ... <input type="something" name="something"> |
Just as with named bookmarks and frames, it is all but required to name the fields, so the data can be processed later.
Input
The most critical one is the <input> tag. The type
of input is specified with the type attribute, and the values are:
checkbox,
radio, or
text,
• Radio Buttons
Radio Buttons are used when you want the user to select only one of a limited number of choices.
<form ...> ... <input type="radio" name="sex" value="male"> Male <br> <input type="radio" name="sex" value="female"> Female ... </form> |
How it looks in a browser:
Note that the form itself is not visible.
Note that only one option can be chosen... each option MUST use the same name=value.
Checkboxes are used when you want the user to select one or more options of a limited number of choices.
<form ...> ... <input type="checkbox" name="penny"> I have a penny<br> <input type="checkbox" name="dime"> I have a dime ... </form> |
How it looks in a browser:
• Text Fields
Text fields are used when you want the user to type a limited number of letters, numbers, etc. in a form.
<form ...> ... First name: <input type="text" name="firstname"> <br> Last name: <input type="text" name="lastname"> ... </form> |
How it looks in a browser:
Note that in most browsers, the width of the text field is 20 characters by default. It can be changed with size=
Note: Textarea fields are used when you want the user to type a longer string of
letters, numbers, etc. in a form.
How it looks in a browser: |
Select
You may also offer your user a set of options from a menu, and let them choose
one...
often a default is selected (yet another rare attribute not followed by an = ).
Selects can look like a dropdown box if size="1"; there will be a scroll bar if there are more options than rows.
Selects are like lists: lists require the helper tag <li> for each item on a list; selects require the helper tag <option>
<form ...> ... |
How it looks in a browser:
or change the select size
<form ...> ... |
How it looks in a browser:
The discussion thus far has just been on collecting the information, but without some method of delivering the collected info, our form is useless. The two <form> attributes that take care of this job are action and method.
Action is a URL that defines where to send the data when the submit button
is pushed.
Method has two settings, the default is get,
the other is post.
Get is used if you are sending more than 100 typed characters.
We also need to add the button to do the actual submission, an input tag with a type="submit"
<form action="URL"
method="something">
...all your other selects and inputs... <input type="submit" value="Submit"> </form> |
How it looks in a browser:
Example:
Processed on studentweb.templejc.edu to simply echoes values chosen
<form action="http://studentweb.templejc.edu/imed1316/cgi-bin/FormValues.asp"
method="post">
or
mail the results to craig.collins@templejc.edu
<FORM ACTION="mailto:craig.collins@templejc.edu?subject=Lab
8 " METHOD="POST" ENCTYPE="text/plain">
See my (humerous[?]) working form
example.
Form Template (replace red items with your text, values, and change names if you like;
the form action in blue, will work as is, generating a list of what is being processed.
Replace the form action if you have access to a server with a database.
)
<html> |
Tip: copy the template above, open NVu or DreamWeaver, change to source view, and paste...
then switch back to normal view and edit
(Don't forget to correct items like title, links to web page, and you will need to add body attributes...)
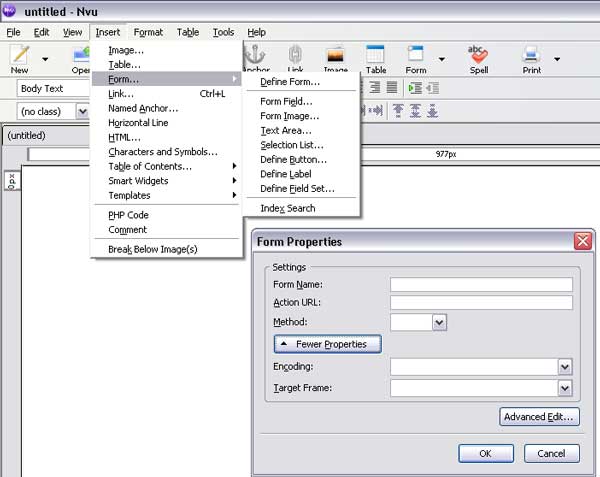
NVu Forms menu and dialog box screenshot;
1st, choose Form\Define form first... and supply the action.and method.
Then, choose Form and then the type of field... don't forget to supply names for each field.
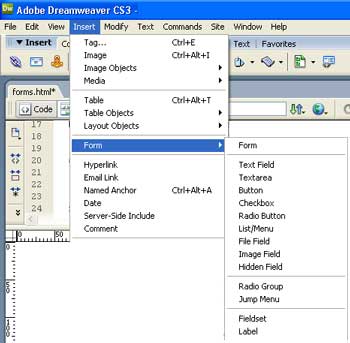
Dreamweaver
Note, Dreamweaver used ID instead of name for fields, and label is text that displays next to the form control.
As before, each field needs a uniquely named ID, aside from radio buttons, which share an ID.