R. Craig Collins >
Web Page Design >
Digital Images Editing Concepts and Digital Cameras
R. Craig Collins >
Web Page Design >
Digital Images Editing Concepts and Digital Cameras
Digital Images ©
R. Craig Collins, 2005/6
Editing your digital images
Many times the images you have collected, whether by camera or by some other means,
are not quite suitable for your presentation. The colors may be off, or the image
is too small, or perhaps something distracting in the image needs to be removed.
Most cameras come with some basic photo editing software. There are also software
packages that are a little more fully features available as well. Some popular
photo editing software (if your cameras package isnt what you need).
- Photoshop (http://www.adobe.com)
- The current standard. On the expensive side. Try out versions available.
Photoshop Elements is great for Web Page support, and is quite a bit cheaper.
- GIMP (http://www.gimp.org)
- FREE, Not as slick as PhotoShop, but very powerful.
How to use GIMP:
- Paintshop Pro (http://www.paintshoppro.com/en/)
- Lview Pro (http://www.lview.com/)
- Bargain priced, some nice features. Try out version available.
- Paint
- Most computers come with a paint program. Often these tools can open,
crop, resize, and save images to a new format. Not great, but already on
your machine.
The most basic steps in photo editing are: crop, resize, adjust brightness
and contrast, adjust color balance or hue/saturation, and changing the resolution.
While photo editing differs from package to package, they use similar steps
that apply to all. Note: the following steps permanently change your images.
If you wish, you can make a copy of your image, then apply the changes you need
for a particular presentation. ·
Crop: Removing unwanted areas of an image
To crop an image
- Choose the selection tool. Often the icon for it is a dashed rectangle.

- Place the pointer at the top left area that you want to include
- Hold down the left mouse button
- Drag the mouse to the lower right corner of the area you want to include.
The area should now be surrounded by a flashing dashed rectangle.
- Issue the crop command, often under the image or edit menu. Only the selected
area remains.
Many packages come with a circular selection tool as well. Some editing software
will also let you define an irregular area. However, when round or irregularly
shaped cropped areas are cropped, they typically are dropped into a white
rectangle.
Resize
- Changing the dimensions of an image. Images typically can shrink well,
but unless it is a very high resolution image, they do not grow well
- If you are planning on printing the image, no other steps need to be done
in the resize arena. However, if you are planning to only use the image
for monitor or projector viewing, you may be able to reduce the resolution
of the image without a noticeable change in the quality of the image, as
monitors arent capable of delivering the sharpness of photographs. A resolution
of between 72 and 96 dpi (dots per inch) works well for monitors. Do this
step first, before resizing.
To resize an image, select the resize command from the edit or image menu. You
may keep the proportions locked, or skew the image by changing the height and
width separately.
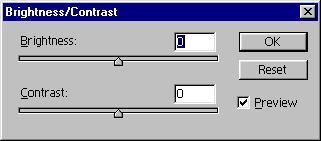
Brightness and contrast
If an image was captured in a poor lighting situation, either too much or too
little, you may be able to compensate a little by adjusting the brightness and
contrast. This is normally done with sliders found under the Image/Adjustment
menu item, or something similar. Many packages allow you to preview the results
as you move the slider. As a rule, you should adjust both values, alternating
between one and then the other.
Color balance
If an image was captured in a poor lighting situation, either too much or too
little, you may be able to compensate for the resultant changes in color by
adjusting the color balance, or hue/saturation. This again is normally done
with sliders found under the Image/Adjustment menu item, or something similar.
Many packages allow you to preview the results as you move the sliders. As before,
it will be a trial and error process, and you should make small changes to all
values, alternating between one and then the other.
Saving changes
There are many formats you may save your edited photos in. Some create
very sharp files, but also take up a lot of disk space. If the image is
for printing, this is desirable, so you might choose the TIFF format. If
the image is for a monitor or projector screen, you dont need all of that
data. JPG or JPEG works very well, and takes up less space than TIFF. GIF
works well only for non-photographic images, such as charts. Only JPG and
GIF are widely supported if you plan to use the image on the web.
Other Methods to Acquire Images
While a digital camera certainly allows you to capture digital images to add
to your presentations, there are other ways to get images.
Print Screen. If you wish to capture some computer output on your monitor,
Windows users can press the [PrtScn] (Print Screen) button on their keyboards.
This copies the image on the monitor to the computers memory, where it can be
pasted into an image in your photo editing software.
Scanner. If you have an image, but it is not in digital form,
you may be able to scan it. Working with the same technology as digital cameras,
they function very much like a copy machine.
Steps to scan. Note, just as with cameras, your scanner and software may vary
slightly. These steps should be similar to your system, whether it is a $49
bargain, or a pro 32 bit drum scanner.
- Place the image to be copied on the glass, and cover.
- Press the preview button.
- Move the selection area in order to just scan the rectangular area of what
you need.
- Set the color depth
*Line art (black and white)
*Gray Scale (usually 256 shades of gray)
*Full Color (May range from 256 colors to the millions, the more the better
for photographs, but the larger the file size becomes.
- Set the resolution.
Again, the higher resolution settings are needed for printing, but 72-96 dpi
works well for monitor, web, or projection.
- Set the scale.
High-resolution scans grow, so your 3x5 image may scan 15x25 inches! You may
wish to choose 50%, to keep image, and the file size, down.
- Save the scanned image, and edit with your software, as before. A rule of
thumb: start with the best scan you can store, then reduce the size and resolution
with your photo editing software package, using trial and error to avoid loosing
too much detail in the capture process.
Other types of presentation media
While still images are the most common addition to a presentation, software
such as PowerPoint can also display many other types of media, such as sound,
animation, and video. These digital files are inserted in just the same fashion
as still images. As with still images, there are several ways to acquire presentation
media. One is to create it. Learning to use Flash or Shockwave can be beyond
your comfort range, but recall, many digital cameras act as video systems too.
Capturing Video
Start the video software that comes with your camera. A postage stamp window
should open, and you will be able to see what the camera is pointed at. Locate
the record button, and when ready, depress it. When you are finished, press
the stop button, or toggle off the record button, just as you would a VCR. You
may be prompted to enter a file name and location. Most cameras saving video
on Windows machines will use the avi format. Macintosh users will likely get
a QuickTime format. To get better quality video, you may be able to simply plug
your digital 8 mm digital camera into a Firewire (IEEE 1394) port on your computer,
especially if you have a Macintosh. The latest releases of the Windows and Macintosh
actually come with software to edit the video, such as cutting out scenes, moving
scenes, adding titles, etc.
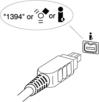
Firewire connection and symbols.
Web Search.
Another way to get media for presentations is pull it of off the Internet.
Remember copyright!
One of the key aspects to creating potent presentations is the ability to include
powerful images to augment your talking points. Many times you will not have
a photo available of your slide topic, but digital cameras allow digital capturing
of images to fill that gap. Or perhaps you have an image, but it is too dark,
or the wrong size for use. The Photo editing software that comes with a camera,
or which can be acquired separately, can make those corrections happen.
Digital Camera Features
Digital Cameras vary, not only in features, such as capacity, resolution, flash
and zoom, but also with the method of retrieving, saving, and erasing images.
Another difference will be in the software that comes with the camera, and how
limited or feature rich the software is. The following is a generic guide to
the operation of cameras and editing software, from the $49 models to the pro
versions.
- Taking pictures
- Most digital cameras operate exactly as traditional film cameras, though
digital cameras may have a noticeable delay from the time the shutter button
is pressed, until the picture is taken. Almost all digital cameras include
a sound effect to let you know when the image has been captured. Some cameras
have a screen to review the images in memory.
- Instead of light hitting film to capture an image, digital cameras use
a semiconductor to collect information. Todays digital cameras typically
use a CCD (charge-coupled device)
for high-end cameras, and CMOS (complementary metal
oxide semiconductor) systems for low-end cameras.
- Resolution
- Refers to the amount of data collected for an image, which is reflected
in how clear the image is. The sharper the image, the more memory that is
required. Cameras with higher megapixel values are capable of capturing
more detailed photographs.
- Resolution also refers to the size of the image that will display on your
computer monitor, such as 640 x 480 pixels, or 1280 x 768 pixels.
- Capacity
- Most digital cameras come with a set amount of memory to store the digitally
captured images. If a lower resolution is chosen for a picture, it will
require less memory, allowing more pictures to be taken.
- Some cameras have removable memory, allowing a replacement memory stick
to be swapped with the original, much like carrying extra rolls of film
for a traditional camera.
- Lighting
- Many digital cameras will allow you to adjust for various lighting situations,
such as for taking pictures in the following situations:
- Sunshiny daylight
- Cloudy daylight
- Normal indoor lighting
- Fluorescent lighting
- Fluorescent lights often add a yellowish tint, this adjustment compensates
for the color difference.
- As with a traditional camera, to compensate for any low light situation,
the shutter collects the image for a longer time, which may lead to blurry
images.
- Special Digital Camera Features
- For an additional cost, you can find cameras with the following features
- Built in Flash. These may accelerate the drain on the cameras battery.
- Rechargeable batteries. Many digital cameras can recharge while in their
cradle connected to the computer.
- Zoom lens
- Sound recorder and microphone. Allows users to add a voice note to a
picture; however this mode typically reduces the number of images that
may be taken, as the memory is now divided for sound and images.
- Video. Some digital cameras can capture a few seconds of video to the
memory, or if connected to a computer, may use the computers hard drive
to capture video. Video captured to the cameras memory may be choppy.
Video delivered to the hard drive is not full screen, but typically very
good quality. These types of cameras may also be used as a web cam, to
send video across the Internet. The quality of these video on the receivers
end is typically poor, but suitable for long distance chatting.
- Retrieving images
- Camera connections
- Most digital cameras today use a USB (Universal Serial Device) connection,
either from the camera to the computer, or from the cameras cradle to
the computer. Most new computers have two or more USB slots. A special
driver that comes with the camera may need to be loaded on the computer.
 Digital Camera on cradle
 |
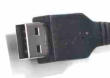 USB Plug USB Plug |
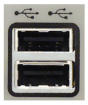
USB Slots |
- Viewing
- Part of the installation process for the digital camera system is to
load included software on the computer. Once the camera is connected to
the computer, often pressing the shutter or a special button on the cradle
will start the software for the digital camera. You can also start the
software in the typical application fashion.
- Many times if automatically started from the camera, the computer will
retrieve all the images in the cameras memory, and place them in some
sort of thumbnail views album. If this is not automatic, there will be
a Get Pictures from Camera command, usually under the file menu.
- Normally, you can click on a thumbnail to view the image full size.
- Digital camera systems vary, in some systems you are viewing the images
from the cameras memory, other times the images are copied to the computer.
If you are using a system that simply displays the images from the cameras
memory, you MUST save the images you wish to keep to the computer before
you erase the cameras memory.
- Saving
- Typically, to save an image, select the thumbnail, then use the standard
File/Save As command, and choose a filename and location
to save the image.
- Erasing
- Once the image has been saved, there is usually no reason to take up
space in the cameras memory. Most cameras will allow the memory to be
cleared both from the camera itself, and from the software package. Some
cameras can only clear memory from one or the other.
- Some, but not all, cameras will allow you to select only certain images
to delete, others will erase all the images... check the particulars on
your system. The ability to remove a bad picture from memory right after
taking it, to free up space, before transferring to the computer is a
very nice feature to have.