In this Tutorial you'll learn how to create four basic types of simple
animations in Flash:
Symbol Motion
Tween
Shape
Tween
Frame-by-Frame
Animation
Guided
Motion Tween
Creating Symbol Motion Tween in Flash
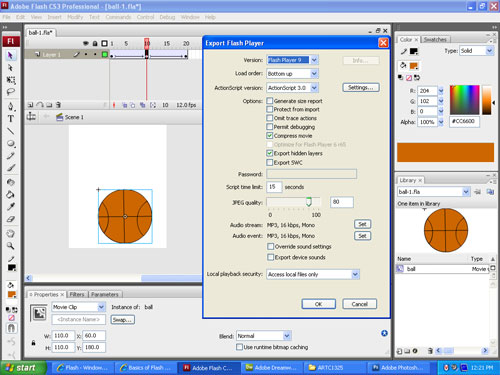
Drawa vector shape using any of the drawing tools in Flash, perhaps a small circle I made a basketball at the top of my canvas (see final product below)
Select the shape(s)... you may wish to use Edit\Select All
Convert the selected shape(s) into a symbol by pressing the [F8] key and name the symbol say
I named mine
'ball'.
This process combines any separate shapes into a single item.
Click a point in the timeline that you wish to be your endpoint and
Insert a frame by pressing the [F5] key.
I chose the 20th frame in the Timeline
Right-click the same end point frame in the Timeline and select Create Motion
Tween
(or Motion option from the Tween panel of the Properties inspector) Again I used the 20th frame.
Make sure the same frame is selected, and insert a Key Frame pressing the [F6] key.
Again, I used the 20th frame
Select another point on the Timeline and insert a Key frame pressing the [F6] key
I used the 10th frame, as it was about halfway between my starting point and my final frame
While this midpoint frame is selected, move the the symbol to a different position for Flash to
create a motion sequence
I moved my 'ball' to the bottom of the canvas Flash will now automatically calculate the animation to move it from the top, to the bottom, and then back to the top... that is, it will automate beTWEEN the frames, or tween.
Save your work
Test the Movie by holding the [Ctrl] key, and then press [Enter]; let go to preview your animation
My final product was Exported as swf file, which requires the free Flash Plug In to view
Notice jpeg compression can be applied
Creating Shape Tween in Flash
Draw a vector using any of the drawing
tools in Flash
I made a small red circle (see final product below)
Remove the border of the shape
To remove the border I choose the selection (arrow) tool,
and moved the colored area away from the border,
then selected the border,
and hit delete.
DO NOT CONVERT THIS TO A SYMBOL, Recall this time we are tweening shapes
Click a point in the Timeline and insert a Key Frame by pressing the [F6] key
I used the 10th frame
Draw another vector shape ON TOP of, and covering the original image,
I made a blue square using the
rectangle tool
Remove the border of the new shape
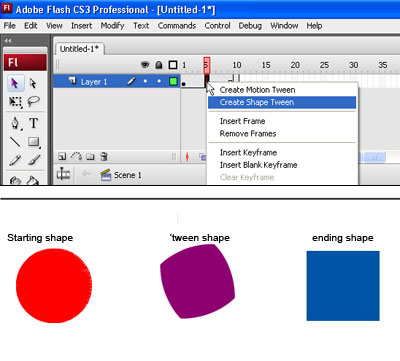
Now right-click on any frame in between these the start point and end frame I chose the 5th frame
Select
Create Shape Tween
An image will appear that is half way between the two shapes
In my case, a purple box with rounded corners
Save your work
Test the Movie by holding the [Ctrl] key, and then press [Enter]; let go to preview your animation
Frame-by-Frame Animation
Create a vector/plain text using any of the drawing tools in Flash, say a
text with 'Animation' typed as shown in the example and break it using Break
Apart (Ctrl + B) to separate the alphabets as shown
below:
Fig: Showing Text after Break Apart
In Frame-by-Frame animation we create the object for each frame so as to
produce an animation sequence.
Insert Keyframe (F6) and move the alphabets so as
to produce an animation sequence.
Repeat the above step as far as desired to create Frame-by-Frame animation
as shown in the example.
Save your work and test the Movie (Ctrl + Enter).
That's it you have created an animation using Frame-by-Frame animation.
Fig: Timeline of Frame-by-Frame
Animation
Creating a Guided Motion Tween
in Flash
Create a vector/plain text using any of the drawing tools in Flash, say a
text with 'Flash' typed and break it using Break Apart (Ctrl
+ B) as done in the previous example and put each alphabet in different
layers and name the layers as shown in the picture below.
Insert a guide layer by right-clicking the topmost layer and select 'Add Guide Layer' (Insert-->Timeline-->Motion Guide), draw any path using
the pencil tool in the guide layer as shown in the example.
Now create Motion tween by selecting the object in the 1st frame and
snapping its registration point to one end of the path.
Snap the object in the last frame to the other end of the path in the
guide layer.
Repeat the same for all the objects (alphabets) by snapping their
registration points to the path in the guide layer.
Save your work and test the Movie (Ctrl + Enter).
That's it you have learned how to create motion along a guided path.