![]()
![]() R. Craig Collins >
Intro to Computer Graphics >Photo Editing
R. Craig Collins >
Intro to Computer Graphics >Photo Editing
Photo Editing © R. Craig Collins, 2008
Up until now, we have been 'adjusting' images; now is the time for 'fixing' images.
 |
While the selection, move, and rotation tools are at the top of the tool box, some really useful tools are down a little further. Some are analogous to the tools we used in Paint, such as the 'fill with color' tool. The 'fill with a color gradient' tool, right next to the 'fill with color' tool on the tool button window, is neat for background layers, or for creating sunset like images... going from perhaps black to dark blue... etc.
|
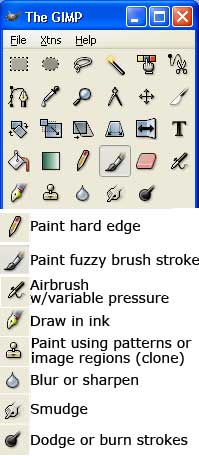
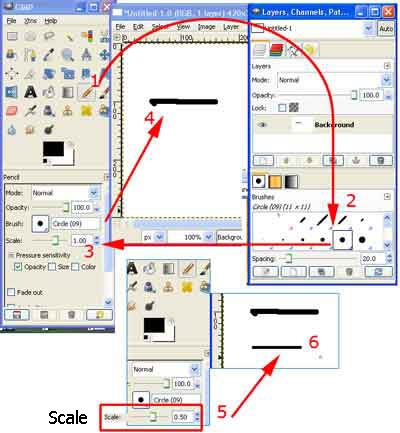
If using the brush, the Paint hard edge (pencil) or the Draw in Ink (pen), you'll want to control the size of the line you make.
1. Select the paint brush or other tool of your choice |
 |
The real challenge to using a good computer graphics tool is to put into an image items that the camera missed. Obvious tools are the pencil like 'paint hard edges' tool, or the 'draw in ink' tool to place crisp or not so crisp lines. The 'smudge' and 'blur or sharpen' tool's jobs are also fairly obvious. But this document is going to cover some photo lab tricks, and some artistic tools.
|
|
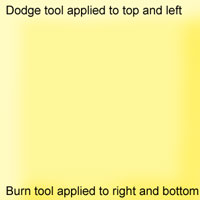
Dodge and burn are photo lab terms. Imagine a light projecting an image onto old fashioned photo paper. The longer the light is projected, the deeper and richer the image becomes. During the exposure, dodging reduces the exposure for areas of the print that the photographer wishes to be lighter, such as lighter edges. After an image is fully developed, burning gives extra exposure to areas of the print that photographer wishes to be darker. The 'dodge and burn' tool in the GIMP can lighten or darken parts of an image, using brush like strokes... rather than adjusting brightness and contrast to the parts of an image. |
'select shapes from image' tool 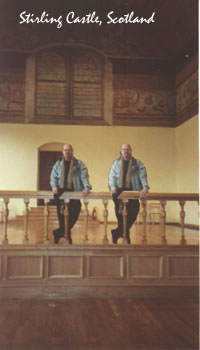 |
As you have seen before, you can copy an image into another image. But it is also possible to copy part of an image, then paste the copied item back into the same file. This works well if what you wish to copy is a rectangle or circular, as these selection tools are built into most graphic editors. For something not round or square, use the 'select shapes from image' tool (also known as the irregular selection tool in other programs... in the GIMP it is the curved line with scissors) to outline select your body in a picture, then copy and paste... so there are two of you, making it looks like you are twins. How to use the 'select shapes from image' tool. To switch between layers, select the appropriate layer on the guide to the right. To hide a layer so you can focus on a different layer, click the eyeball icon. To un-hide, click the same button. The original image that was the starting point for the 'twins' picture is at the bottom, for comparison. A great thing about layers, by the way, is to allow you to erase parts of your image without messing up the other. Erasing can be one of the most challenging tasks... it normally helps if you magnify the image about 2 or 4 times (200% or 400%), then experiment with different size and shaped erasers. Hard edges can be softened with the blur tool, or perhaps dodge and/or burn can be used to tweak the addition, to better match the background image. |
Experiment with one of the class pics for example; cut someone out, clean up around the person with the eraser, then paste them into a different image, making adjustments as needed.
Note: (the GIMP Red Eye Removal: Filters \ Enhance \ Red Eye Removal)
Don't forget that you may have to flatten the image in order to save it as a jpeg or png. In the GIMP, choose Layer\Merge Down.
Finally, one of the most elegant copy tools. Perhaps your image has an ugly trash can right in the middle of your picture of the park. You might be tempted to select a square area of grass around it, then paste over the trash can. But to often the mismatch in texture betrays your edit. Or perhaps your photo of a great sunset includes power lines across the sky. As the sky is shifting in color throughout, it could be a nightmare to try and copy/paste clear sky over the power lines. The tool that rides to the rescue is often called the clone tool.
The clone tool is used to replace information for one part of a picture by duplicating information from another part. The most common usage, in the photo lab, is to remove blemishes. Simply point out a good part of the image to the computer, then point out the marred area, and as you move your clone tool, the target color and texture is applied. As with the eraser, the size and hardness of the clone tool can be varied, letting you select very specific area to use when touching up.
The images below, at the Trianon-Petite near Versailles in France, show how some people were removed, by duplicating very small but specific areas, using the clone tool. The image on the right is still in process, but the people by the line of trees are completely gone, and the jacket shoulder in the lower right is almost gone. A little more cloning, a bit of blurring or smudging, and the casual observer would not be aware of the edit.
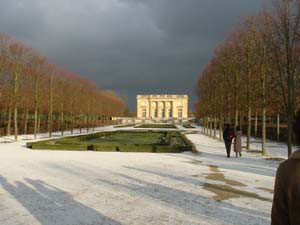
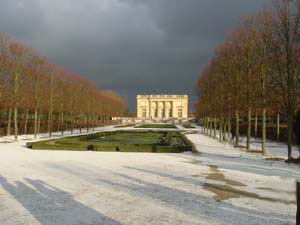
Is this cheating? As were are not misrepresenting anything, most experts agree that is a legitimate use of the tools at hand.
Experiment. From above, save the image on the left, then use the clone tool.
How to use the clone tool.
If you want to clone from an image, instead of a pattern, you must tell GIMP which image you want to copy from. You do this by holding down the Ctrl key and clicking in the desired source image. Until you have set the source in this way, you will not be able to paint with the Clone tool: the tool cursor tells you this by showing a “forbidden” symbol.
If you clone from a pattern, the pattern is tiled; that is, when the point you are copying from moves past one of the edges, it jumps to the opposite edge and continues, as though the pattern were repeated side-by-side, indefinitely. When you clone from an image this does not happen: if you go beyond the edges of the source, the Clone tool stops producing any changes.
To learn to use these tools, it is probably best to watch the related video. • Video on photo editing
An un-scaled version of the original Stirling Castle picture